About Bathroom Painting
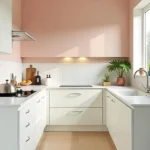
Choosing the right type of paint for a bathroom requires careful consideration of various factors. Floorings, the overall color scheme, and the room’s size significantly influence the selection process. Bright or bold shades may enhance larger bathrooms, while light colors can create an illusion of more space in smaller ones. Furthermore, popular bathroom paint colors like warm gray, greige, sage, navy, blush, powder blue, and white can set a serene or vibrant atmosphere, depending on personal preferences. Updating accents, such as cabinet colors and fixtures, alongside painting, can also provide a comprehensive refresh to the bathroom’s appearance.
Before embarking on the painting journey, preparing the bathroom surfaces by conducting a deep clean is essential to ensure a smooth application and lasting finish. This introductory guide to mastering the art of bathroom painting will traverse considerations like understanding bathroom humidity, selecting the best paint finishes for bathrooms, knowing when to use paint additives, and picking the correct primer. Additionally, it will delve into how paint colors can influence bathroom lighting, along with sharing preparation and application tips. This article aims to equip readers with knowledge about what type of paint for bathroom use, optimized for both functionality and aesthetics.
Understanding Bathroom Humidity
Understanding the impact of bathroom humidity on paint is crucial for a long-lasting and mold-resistant finish. Here are key considerations:
- Choosing the Right Paint:
- Opt for paints that resist moisture, as bathrooms are high-moisture areas.
- Water-based paints are recommended for their resistance to mold and mildew growth.
- Consider mold-resistant paints or adding an antimicrobial additive to combat mildew in humid environments.
- Preparation and Prevention:
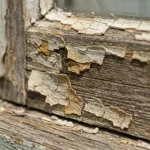
- Address existing mold by cleaning it off before painting. Painting over mold does not solve the underlying issue.
- Use a moisture-detecting bathroom fan switch to prevent mold and mildew.
- Proper ventilation is essential. Use exhaust fans during and after showers to control humidity levels.
- Primer and Paint Additives:
- Applying a primer is vital in bathrooms to prevent mold growth, peeling paint, and ensure a smooth finish.
- Choose a primer that withstands high humidity and moisture.
- Paint additives enhance mold and mildew resistance, crucial in high moisture areas.
By addressing humidity through the right choice of paint, preparation, and preventive measures, you can ensure a durable and mold-resistant bathroom paint job.
The Best Paint Finishes for Bathrooms
When considering what type of paint for bathroom projects, it’s essential to focus on finishes that offer durability, moisture resistance, and ease of cleaning. Here’s a breakdown of the best paint finishes for bathrooms:
- High-Quality Paints: Opt for high-quality paints that contain more solids for greater durability, ensuring a long-lasting finish that can withstand the bathroom’s humid environment.
- Paint Sheens:
- Glossy Finishes: Semi-gloss and high-gloss finishes are highly recommended because they repel moisture effectively and are easy to wipe clean. These sheens are particularly suitable for moldings, doors, and cabinets, offering a shiny appearance that also resists mold and mildew.
- Satin Finish: This is ideal for bathroom walls, providing a balance between matte and gloss. It offers a harder finish than matte paints, making it more moisture-resistant and washable.
- Eggshell Finish: Known for its low-sheen, matte-like appearance, eggshell is a good choice for those who prefer less gloss but still require moisture protection. It can hide imperfections well and is easier to maintain than flat or matte finishes.
- Specialty Paints:
- Mildew-Resistant Paints: Always choose a paint labeled as mildew-resistant or consider adding an antimicrobial paint additive. These options help prevent mold growth, a common issue in humid bathroom environments.
- Antimicrobial Paints: Some manufacturers offer paints with antimicrobial properties that kill existing mold and prevent new growth, adding an extra layer of protection in high-moisture areas.
Selecting the right finish will not only enhance the bathroom’s aesthetic but also ensure the paint job stands up to the unique challenges of the space.
The Role of Paint Additives
In enhancing bathroom paint’s performance and durability, incorporating specific paint additives can be transformative. Here’s how various additives play a crucial role:
- Flow and Drying Time Adjustments:
- Penetrol/Floetrol or X-I-M Paint Extender: These additives improve paint flow, minimize brush or roller marks, and extend drying time, which is particularly beneficial in achieving a smooth finish in humid bathroom environments.
- Safety and Maintenance:
- Non-skid Additives: For areas prone to moisture, such as bathroom floors, adding a non-skid additive like Anti-Skid Additive from Sherwin Williams ensures safety by reducing slipperiness.
- Mildewcide and Antimicrobial Additives: To combat mold and mildew growth, mildewcide additives are essential. Moreover, antimicrobial additives not only fight against a variety of microbes, including antibiotic-resistant bacteria, but also extend the paint’s shelf life and maintain surface aesthetics by preventing unsightly mold.
- Enhanced Durability:
- For High-Traffic Areas: Additives that increase abrasion resistance are ideal for prolonging the life of paint in areas like stair risers, ensuring the bathroom withstands frequent use.
- Improved Cleanability: Certain additives enhance the paint’s cleanability, making bathroom maintenance easier and more efficient.
These targeted additives offer tailored solutions to common bathroom painting challenges, ensuring both the longevity and functionality of the paint job.
Choosing the Right Primer
Priming the walls before painting is a critical step that ensures the durability and longevity of the paint job, especially in high humidity areas like bathrooms. Primers serve as a preparatory coating that improves paint adhesion, durability, and appearance. Depending on the surface and specific needs, there are different types of primers to consider:
- Latex Primers: Ideal for most surfaces including drywall, plaster, and wood. They are water-based, quick-drying, and have a low odor.
- Oil-Based Primers: Known for their durability and excellent stain-blocking properties. Best for surfaces that will be exposed to moisture but have a longer drying time and stronger odor.
- Shellac Primers: The go-to option for blocking stains and odors. They dry quickly but are more expensive and emit a strong odor.
When choosing a primer for bathroom surfaces, consider the following features:
- Mold-Resistant: To prevent mold and mildew growth in humid environments.
- Stain-Blocking: Useful for covering existing stains or smoke damage, ensuring they don’t bleed through the topcoat.
- Adhesion: Enhances paint adhesion on glossy or non-porous surfaces, making it ideal for shiny surfaces like glass or tile.
For specific surfaces:
- Painted Wood: Use an oil-based primer for exposed wood or chipped paint.
- Porous Surfaces: Opt for a primer formulated for materials like new drywall, plaster, and stucco.
- Shiny Surfaces: Bonding primers are recommended for their strong adhesion.
Before painting, it’s crucial to repair any water damage and ensure surfaces are clean and dry. Using a mold-inhibiting primer can prevent future mold growth, safeguarding the bathroom’s appearance and hygiene.
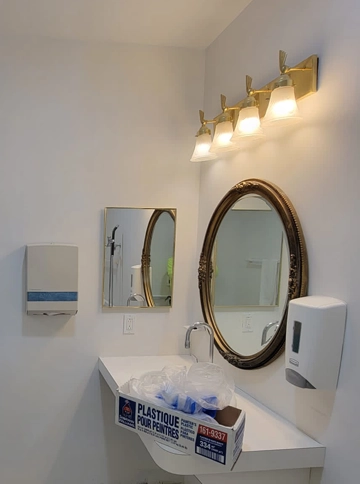
Paint Colors and Bathroom Lighting
When selecting paint colors for a bathroom, lighting plays a pivotal role in how those colors will ultimately appear. Here are key considerations to guide your choice:
Understanding Light Sources
- Natural Light:
- North-facing windows offer a cooler, indirect light, making colors appear more muted.
- South-facing windows provide intense light, potentially washing out pale colors but enhancing darker hues.
- For a balanced light that accurately represents colors, east and west-facing windows offer a mix of warm and cool light throughout the day.
- Artificial Light:
- Incandescent bulbs enhance warm tones, making colors appear richer.
- LED and fluorescent lights emit cooler tones, complementing blues, greens, and grays.
- The color temperature of bulbs, measured in Kelvins, affects the perception of paint colors; lower temperatures yield warmer tones, while higher temperatures result in cooler tones.
- A bulb’s Color Rendering Index (CRI) can also impact how paint colors look; higher CRI ratings ensure colors are closer to their true appearance.
Practical Tips for Choosing Paint Colors
- Sample Testing: Always test paint swatches in various places on each wall to observe how different lighting conditions affect the color.
- Consider Room Orientation: Paint colors can change significantly based on the room’s orientation to natural light. Rooms facing different directions may require different shades to achieve the desired effect.
- Complementary Colors: Ensure the chosen paint color harmonizes with existing elements like tiles, flooring, and fixtures. Undertones in these elements can influence how the paint color looks in the room.
By carefully considering both natural and artificial lighting, as well as testing colors in the actual space, one can ensure the selected paint enhances the bathroom’s aesthetic under various lighting conditions.
Preparation and Application Tips
To ensure a successful bathroom painting project, follow these preparation and application tips:
Preparation Steps:
- Measure and Calculate: Determine the bathroom’s square footage to estimate how much paint you’ll need.
- Surface Preparation:
- Deep clean walls and trim with a 1:3 bleach-to-water solution or diluted TSP cleaner to remove soap scum and other residues.
- Patch holes or cracks with filler or drywall compound and allow it to dry for 6 to 24 hours.
- Remove the toilet to simplify painting around it, ensuring comprehensive coverage and ease.
- Protecting the Area:
- Lay drop cloths over the floor and fixtures to protect them from paint splatters.
- Use painter’s tape and plastic sheeting to cover areas not being painted.
Application Techniques:
- Painting Process:
- Start with cutting in around edges and corners using a 2-inch sash brush.
- Use a roller for larger surfaces, applying paint from top to bottom to prevent drips and ensure even coverage.
- Maintain a wet edge with the roller to avoid streaks.
- Drying and Recoating:
- Allow at least two hours for the first coat to dry before applying the second.
- For high-moisture environments, apply at least two coats, waiting four to six hours between coats.
Post-Painting Steps:
- Carefully remove painter’s tape after the final coat has dried.
- Clean up any splatters immediately to simplify removal.
- Replace all removed items only after the paint has completely dried.
- Consult the paint’s technical data sheet for proper cleaning of brushes and rollers.
By adhering to these steps, you will achieve a beautiful and durable finish in your bathroom painting project.
Conclusion
Through meticulous discussion, this article has provided valuable insights into selecting the appropriate paint, primer, and finishes for bathroom spaces, thereby addressing the challenges imposed by humidity and the need for durability and aesthetic appeal. It emphasized the significance of preparing the surface adequately, choosing mold-resistant materials, and understanding the impact of lighting on paint colors to create a harmonious bathroom environment. Highlighting the importance of careful paint selection and the strategic use of additives underscores the article’s focus on achieving both functional and visually pleasing outcomes.
The journey through mastering the art of bathroom painting doesn’t end here, but rather opens the door to personalized exploration and application of these principles in individual projects. By inviting further research and encouraging attention to detail, readers are equipped to make informed decisions that cater to their unique bathroom environments. With a foundation laid on comprehensive preparation, selection, and application guidelines, the path to transforming a bathroom into a resilient, inviting space is now clear, ready for readers to embark with confidence and creativity.
FAQs
The best paint finishes for bathrooms are typically satin or semi-gloss. These finishes are easier to clean and are more resistant to moisture. Semi-gloss paint, in particular, is highly recommended for bathrooms due to its ability to repel moisture effectively.
Latex paint is the most suitable for bathroom environments because it has excellent moisture resistance. Starting with a mildew-resistant primer can further enhance the longevity and performance of the paint job. Sherwin-Williams offers a product called Emerald Interior Acrylic Latex Paint that includes anti-microbial properties, making it an excellent choice for bathroom painting.
To avoid peeling paint in the bathroom, opt for semi-gloss paint. This type of paint is designed to be moisture-resistant and withstand temperature fluctuations without bubbling or peeling. A good-quality semi-gloss paint should maintain its integrity for at least five years with moderate to heavy usage.
Certainly! Here are the steps to follow when painting a master bathroom:
- Select the best type of paint for the bathroom, considering moisture resistance and ease of cleaning.
- Calculate the amount of paint you will need for the project.
- Thoroughly clean all surfaces that you plan to paint.
- Detach the toilet tank to avoid painting difficulties.
- Remove any other items that might obstruct the painting process.
- Protect areas that you do not want to paint with covers or tape.
- Begin painting the edges of the walls (“cutting in”) before covering larger areas.
Use a roller to apply paint to the broad surfaces of the walls for an even finish.